
Introduction
GRALESHELL is an interactive shell to help simulate gravitational lenses and to invert lensing systems. Internally, it uses the GRALE library to accomplish these tasks. Some additional information can be found at the website: http://research.edm.uhasselt.be/jori/grale/grale.html
License
The license which applies to this library is the GPL. You can find the full version in the file LICENSE.GPL which is included in the library archive. The short version is the following:
 This program is free software; you can redistribute it and/or modify
 it under the terms of the GNU General Public License as published by
 the Free Software Foundation; either version 2 of the License, or
 (at your option) any later version.

 This program is distributed in the hope that it will be useful,
 but WITHOUT ANY WARRANTY; without even the implied warranty of
 MERCHANTABILITY or FITNESS FOR A PARTICULAR PURPOSE.  See the
 GNU General Public License for more details.

 You should have received a copy of the GNU General Public License
 along with this program; if not, write to the Free Software
 Foundation, Inc., 51 Franklin St, Fifth Floor, Boston, MA  02110-1301
 USA
Tutorial
After installing GRALESHELL using the CMake system, just start the graleshell executable to start the program in interactive mode. Depending on whether Qt was available or not, you'll get one of the following interactive environments:
Qt-version:

Terminal version:
For now, we'll assume a Unix-like environment and we'll use the '$' sign to indicate the regular command line prompt. So, if you do this:
$ graleshell
You'll then either see the Qt interface waiting for command input, or just a prompt like this:
graleshell>
This indicates that the program was started successfully and you can start using it.
Alternatively, you can create a text file containing the commands you want to execute, say 'input.txt', and start the program like this:
$ graleshell input.txt
or like this:
$ graleshell - < input.txt
Note that if some error occurs, the rest of the commands in the file will not be executed.
When in doubt:
- 'help' lists all commands
- typing 'help' followed by a command name will display additional information about that command
- '*' can be used to specify explicitly that you want to use the default value of a parameter.
Commands and arguments
You interact with the graleshell environment by typing command lines, which are split into a number of arguments. Different arguments are separated by spaces or tabs. The first one specifies the command to be executed, the rest specify additional parameters.
The help page of a command shows which types of parameters are expected. For example:
 graleshell> help cosm/set

 USAGE:
 cosm/set h omega_m omega_r omega_v w

 DESCRIPTION:
 Sets the current cosmological model parameters.

 ARGUMENTS:
 (1) h (Real) (Default: '0.71')
 Value of the Hubble constant H0, expressed in units of 100 km s^-1 Mpc^-1.

 (2) omega_m (Real) (Default: '0.27')
 Matter density parameter.

 (3) omega_r (Real) (Default: '0')
 Radiation density parameter.

 (4) omega_v (Real) (Default: '0.73')
 Vacuum density parameter.

 (5) w (Real) (Default: '-1')
 Parameter for the equation of state of the vacuum.
In this case the command cosm/set needs five additional parameters, all real numbers. In this case, all of them have a default value, so just entering cosm/set without any additional parameters is valid and will use all of these default values.
Whenever an argument needs to be an integer or a real numbered value, you may also specify a calculation. So for example, we could write
graleshell> cosm/set 0.3+0.4
Remember that spaces are used to separate variables, so
graleshell> cosm/set 0.3 + 0.4
would not work: 0.3 would be considered as the first parameter, '+' as the second one, and 0.4 as the third one. If you need spaces for readability, use double quotes to indicate what belongs together as a single argument:
graleshell> cosm/set "0.3 + 0.4"
Besides simple arithmetic, you can also use functions. Apart from the usual functions like sin, exp etc, the following ones are defined as well:
- z(x) Calculates the angular diameter distance between ourselves and redshift x
- zz(x,y) Calculates the angular diameter distance between redshifts x and y. So zz(0,x) = z(x)
- rnduni(x,y) Calculates a random number between x and y
- rndgauss(m,s) Calculates a random number from a gaussian distribution with mean m and width s.
Units
When entering a command on the prompt, some real-valued arguments will be evaluated in terms of predefined units. Currently, it is possible to specify what to use for the unit of mass, for the angular unit and for the distance unit. The commands unit/mass/show, unit/angular/show and unit/distance/show will display the current settings. The defaults are shown below:
  graleshell> unit/mass/show

  MASS UNIT:
   1 M_sun
   1.98892e+30 kg

 graleshell> unit/angular/show

 ANGULAR UNIT:
  1 arcsec
  0.0166667 arcmin
  0.000277778 deg
  4.84814e-06 rad

 graleshell> unit/distance/show

 DISTANCE UNIT:
  0.001 Gpc
  1 Mpc
  1000 kpc
  1e+06 pc
  3.08568e+22 m
The values can be changed using the commands unit/mass/set, unit/angular/set and unit/distance/set. For example, the following command sets the distance unit to 1 Gpc:
graleshell> unit/distance/set 1 Gpc
To know which type of unit to specify a value in, usually it is enough to use common sense. If you're not sure, just take a look at the help page of the command you want to use. There, the unit type for each real-valued parameter is mentioned. The example below illustrates this:
 graleshell> help lens/new/plummer

 USAGE:
 lens/new/plummer D_d mass width

 DESCRIPTION:
 Create a Plummer lens.

 ARGUMENTS:
 (1) D_d (Real - Unit: Distance)
 Angular diameter distance between lens and observer.

 (2) mass (Real - Unit: Mass)
 Total mass of the Plummer lens.

 (3) width (Real - Unit: Angular)
 Width parameter of the Plummer distribution.
Predefined names
To improve the readability of the code, it may be useful to define some very general variables using the pre/def command. For example, by entering the command:
graleshell> pre/def FILENAME mytestfile.gnuplot
every time the program encounters $FILENAME, it will substitute its value before parsing the command entered. So this means that:
graleshell> imgplane/plot/gnuplot $FILENAME
would create a plot of the image plane and save it to the file 'mytestfile.gnuplot'. Note that for this type of substitution you need to write a dollar sign before the variable name.
You can get a list of the variables currently defined in this way using the pre/list command:
 graleshell> pre/list
  FILENAME = mytestfile.gnuplot
An important property of these types of variables, is that it's just a string replacement. This means that the contents only need to make sense at the time the variable is used in a command.
Mathematical variables
Apart from the previous types of variables, you can also assign names to the results of mathematical expressions. For example, we could write:
 graleshell> math/def HubbleConst 0.7
 Result: HubbleConst = 0.7
 graleshell> cosm/set HubbleConst
This only works for numerical values, and most importantly, the program must be able to evaluate the expression right away, not just when the variable is used.
So for example, entering these commands doesn't work:
 graleshell> math/def X 0.3+myVar
 graleshell> math/def myVar 0.4
 graleshell> cosm/set X
This is because the the first command can't be executed since myVar hasn't been defined yet. The following on the other hand, does work:
 graleshell> pre/def X 0.3+myVar
 graleshell> math/def myVar 0.4
 graleshell> cosm/set $X
In this second case, it's just a string substitution, so the program sees the last command as
graleshell> cosm/set 0.3+myVar
and since myVar was defined, it works.
Simulating gravitational lenses
To simulate a gravitational lensing situation, in general you need to do at least three things:
- select which type of gravitational lens to use
- specify the distances to the source plane
- calculate the mapping from image plane to source plane on a grid.
Let's start with a simple point mass lens. The following command creates a point mass lens of 2e11 solar masses and places the lens at an angular diameter distance of 1000 Mpc:
graleshell> lens/new/pointmass 1000 2e11
Next, we'll create a source plane with 1500 Mpc and 800 Mpc as the distances from source to observer and source to lens respectively:
graleshell> srcplane/new 1500 800
Now that we've got a lens and source plane, we can calculate the mapping from image plane to source plane. The following command creates this mapping for the square shaped area between (-1.5'', -1.5'') and (1.5'', 1.5'') on a 512 by 512 grid:
 graleshell> imgplane/new/local -1.5 -1.5 1.5 1.5 512 512
 Building map
  100%
 Searching for critical lines and caustics
  100%
 Finished
At this point, we could already plot the critical lines and caustics, but to make things a bit more interesting, we'll first add a circular source to the source plane. The following command adds such a source at location (0.21'', 0.13''), sets the brightness value to 1 and the source radius to 0.06''. The first 0 on the line is simply an identifier for this source.
graleshell> sources/add/circle 0 0.21 0.13 1 0.06
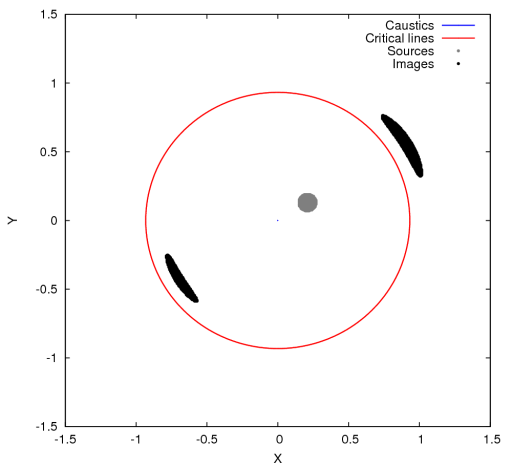
The following command creates a gnuplot file names 'imgplane.gnuplot' containing information about the images, the sources, the critical lines and the caustics (you can turn these off by replacing the the corresponding 'yes' by a 'no'). The x-axis will be labeled 'X', the y-axis will be labeled 'Y'. The final 'yes' means that we would like a color-plot instead of a black and white one.
graleshell> imgplane/plot/gnuplot imgplane.gnuplot yes yes yes yes X Y yes
This gnuplot file can be converted to an EPS file using the command
$ gnuplot imgplane.gnuplot >imgplane.eps
outside of the GRALESHELL program. From within the program you can execute other programs using the exec command. This means that
graleshell> exec "gnuplot imgplane.gnuplot >imgplane.eps"
will accomplish the same task, but without leaving the GRALESHELL environment. In the example above, the 'imgplane.eps' file will contain the following image:
You can also create a FITS file of the images (or of the source) but no critical lines or caustics can be shown then. To create a FITS file, you can use the following command:
graleshell> imgplane/plot/fits imgplane.fits
If you're planning on using the same gravitational lens to calculate images for sources at different distances, it may be easier to first calculate the deflection angles at the lens plane. To do this you can use the command:
graleshell> lensplane/new/local -1.5 -1.5 1.5 1.5 512 512
From this 'lensplane' you can then create an image plane using the command
graleshell> imgplane/new/lensplane
Note that a source plane has to be created first using the srcplane/new command, before you can create an image plane. For a lens plane this is not the case, only a lens needs to be created.
To illustrate the use of this lens plane command, first consider the following example in which the mapping from image plane to source plane is calculated for three different source plane locations.
 graleshell> srcplane/new 1500 800
 graleshell> imgplane/new/local -1.5 -1.5 1.5 1.5 512 512
 Building map
  100%
 Searching for critical lines and caustics
  100%
 Finished
 graleshell> srcplane/new 1600 850
 graleshell> imgplane/new/local -1.5 -1.5 1.5 1.5 512 512
 Building map
  100%
 Searching for critical lines and caustics
  100%
 Finished
 graleshell> srcplane/new 1700 900
 graleshell> imgplane/new/local -1.5 -1.5 1.5 1.5 512 512
 Building map
  100%
 Searching for critical lines and caustics
  100%
 Finished
The 'Building map' step can take up quite some time, especially when the lens is more complicated or the desired resolution is quite high. This step is also done when creating the deflection angle map for the lens plane, and this calculation can then be borrowed when creating an actual mapping between image plane and source plane. The example below creates the same three image plane maps by first calculating the deflection angles using the lensplane/new/local command and then using these in the imgplane/new/lensplane command. Notice how the 'Building map' step is only done once, only the critical lines and caustics still need to be calculated for each source plane setting.
 graleshell> lensplane/new/local -1.5 -1.5 1.5 1.5 512 512
 Building map
  100%
 Finished
 graleshell> srcplane/new 1500 800
 graleshell> imgplane/new/lensplane
 Creating map from lens plane
 Searching for critical lines and caustics
  100%
 Finished
 graleshell> srcplane/new 1600 850
 graleshell> imgplane/new/lensplane
 Creating map from lens plane
 Searching for critical lines and caustics
  100%
 Finished
 graleshell> srcplane/new 1700 900
 graleshell> imgplane/new/lensplane
 Creating map from lens plane
 Searching for critical lines and caustics
  100%
 Finished
Distributed calculation of deflection angles
Calculating the deflection angles using lensplane/new/local or calculating the mapping from image plane to source plane using imgplane/new/local can take quite some time, especially if the lens is complex or the required resolution is high. If you have several computers at your disposal, you can speed things up by letting each CPU do a specific part of the calculation. Other than a bunch of other computers, you also need the programs gralerenderserver and gralerenderer which come with the GRALE library.
First, you need to start gralerenderserver. The program takes one argument, a TCP/IP port number on which it will listen for incoming connections. The precise value isn't really that important, you just have to know what it is. If want to let your operating system choose a port number for you, just use zero as in the example below.
 $ gralerenderserver 0
 Listen socket created at port 45787
On each of the computers that you want to distribute the calculations over, you'll have to start one or more instances of the gralerenderer program. This program needs two arguments: the first one is the IP address of the computer on which the 'gralerenderserver' program was started, the second one is the port number on which that program is listening for incoming connections (in the example above this is 45787). For example, if the server program was started on a computer with IP address 10.1.1.1, the following command starts the gralerenderer program:
 $ gralerenderer 10.1.1.1 45787
 Connecting to server
 Sending identification
 Installing signal handlers
Remember that you have to start one or more of these 'gralerenderer' programs on each computer that is available to help with the calculations.
Then, inside the GRALESHELL program, you can use the commands lensplane/new/remote or imgplane/new/remote to make use of the combined computational power of all these computers. For example:
 graleshell> imgplane/new/remote -1.5 -1.5 1.5 1.5 512 512 10.1.1.1 45787
 Connecting to server
 Sending identification to server
 Waiting for reply from server
 Got positive reply from server, sending data
 Rendering...
  100%
 Received solution from server
 Closed server connection
 Searching for critical lines and caustics
  100%
 Finished
Other lenses
Besides the point mass lens used in the example above, some other basic lenses are available. As is the case for the point mass lens, all these mass profiles are centered on the origin of the coordinate system.
- lens/new/sis: A singular isothermal sphere
- lens/new/sie: A singular isothermal ellipse
- lens/new/nsis: A non-singular isothermal sphere
- lens/new/nsie: A non-singular isothermal ellipse
- lens/new/plummer: A projected Plummer sphere
- lens/new/square: A square shaped region of constant density
- lens/new/gaussian: A two-dimensional gaussian density profile
The following commands allow some more complex shapes of the mass density:
- lens/new/mplummers: Multiple projected Plummer spheres
- lens/new/msquares: Multiple square-shaped profiles
- lens/new/mgaussians: Multiple gaussian profiles
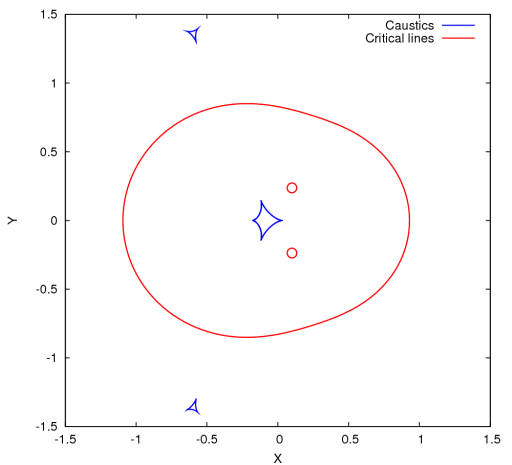
You can save lenses using the lens/save command and you can load a previously saved lens using the lens/load command. You can combine several saved lenses by using the command lens/new/composite command, allowing you to scale, rotate and translate each component. The example below shows how you can use a saved point mass lens to create a binary lens.
 graleshell> lens/new/pointmass 1000 2e11
 graleshell> lens/save pointmass.lens
 graleshell> lens/new/composite
 Enter component parameters below. Type 'end' to end input.
 Argument order is:
 xcenter ycenter angle scalefactor filename
 Component info: -0.25 0 0 0.7 pointmass.lens
 Component info: +0.25 0 0 0.3 pointmass.lens
 Component info: end
 graleshell> srcplane/new 1500 800
 graleshell> imgplane/new/local -1.5 -1.5 1.5 1.5 512 512
 Building map
  100%
 Searching for critical lines and caustics
  100%
 Finished
 graleshell> imgplane/plot/gnuplot imgplane2.gnuplot no no yes yes X Y yes
 graleshell> exec "gnuplot imgplane2.gnuplot >imgplane2.eps"
 Executing command: gnuplot imgplane2.gnuplot >imgplane2.eps
 Done
The critical lines and caustics in the file 'imgplane2.eps' then look like this:
Inverting gravitational lenses
[Under construction]
Contact
If you have any questions, remarks or requests, you can contact me at jori(dot)liesenborgs(at)gmail(dot)com