GRALE Editor
Note: this page is far from complete, the most complete description of what it can do can be found in the tutorial.
The GRALE Editor is a Graphical User Interface (GUI) tool to help create and visualize input that’s going to be used for gravitational lens inversions.
Layers
There are three types of layers:
Points layer: various kinds of point-based information can be defined in such a layer, e.g. points of a specific image or null space points and triangles. The information from such layers can be stored in a file describing
images data, which can be used when running a lens inversion.FITS layer: for reference, FITS files can be shown and the XY-coordinate system can be centered on a specific point in the FITS image.
RGB layer: if a PNG or JPG already exists that, for example, combines several FITS files, this can be shown as well. This can subsequently be aligned to a FITS layer that’s been loaded.
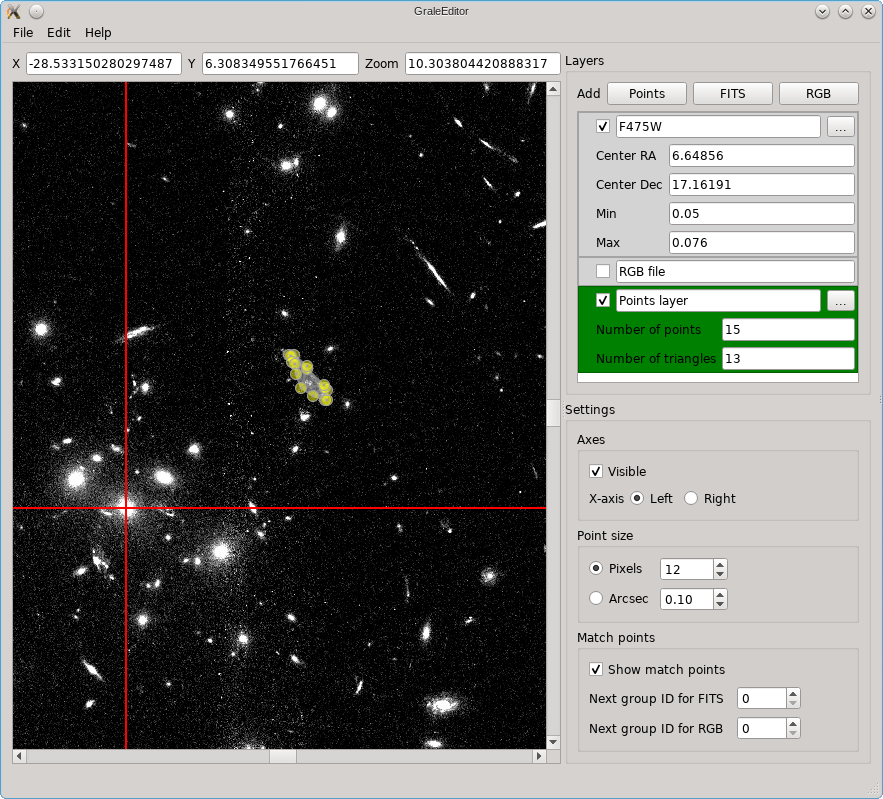
Multiple layers of each type can exist at the same time, but only one layer can be specified as the active layer. The active layer will be indicated by a green color (see image below) and depending on which layer is active, mouse and keyboard controls will have different effects. While there are three layers in the example below, the RGB layer is not shown, which is indicated by the unchecked box. Different layers are shown on top of each other, the one shown first (from top to bottom) in the GUI is the one that’s drawn first.
General controls
When moving the mouse over the part of the GUI in which the layers are actually displayed, you’ll see the values behind the ‘X’ and ‘Y’ fields change. Their units are arc seconds. If you enter a different value and press enter, that coordinate will be shown in the center of either X or Y direction.
To zoom in/out you can either specify a different zoom level in the
‘Zoom’ field, or you can press Control and use the mouse wheel.
Pressing the keys 0 to 9 will set the zoom to \(2^n\). Without
pressing Control, you’ll just move the entire area that’s displayed
up or down, and when ‘Alt’ is displayed the area will move left/right.
Two very useful general controls are:
undo:
Control-Zredo:
Shift-Control-Z
FITS layer
The XY axes (shown in red when visible) will be aligned with the right ascension (RA) and declination (dec) axes from the FITS file, but the point that’s used as the center can be specified: either by entering the appropriate coordinates in the ‘Center RA’ and ‘Center Dec’ boxes, or by making sure the layer is active and double clicking on the point that should be used as the center. The values in the FITS file are shown on a linear (gray)scale, where the boundaries can be specified in the ‘Min’ and ‘Max’ fields. A right click on a FITS layer will show a dialog in which these properties can be changed as well.
If a FITS layer is active, a single mouse click will show a cross with a number below it. This label is based on the ‘Next group ID for FITS’ setting, but can always be changed into something else. These points will be used as reference points when an RGB layer needs to be transformed to match the FITS layer (see next section).
RGB layer
Points layer
TODO: for now these are just some very basic notes, mainly for myself. Needs much cleaning up.
Command line
Usage:
grale_editor [arguments]
- Is:
--nocheck: when exiting, don’t ask to save changes if there are any
- Starts with:
--zoom:: sets zoom level--imgdataname:: sets latest images data file name, can be useful to set export name--imgplane:: pre-loads the following file to be used in the back-projection related tools. This file should be a pickled ImagePlane or MultiImagePlane
Argument ends with
.json: loads scene if first argument, adds to existing scene if not the first argument
.png or .jpg: adds image layer with this image
.fits: adds fits layer for this file
.imgdat or .imgdata: adds the information for the images data file. By default, all images are added into a single image layer. By specifying a number followed by a comma and then the file name, that specific image is loaded into an image layer. If the number is negative, each image in the file is added as a separate image layer.
If the argument is just ., an empty points layer is added.
Keyboard and mouse controls
- Single click:
mouse on point: toggles point selection
adds point if points layer is active, match point if FITS/image layer is active. If ‘ctrl’ is pressed, automatically starts adding a label
clears selected points unless ctrl is pressed
- If points layer active, and left mouse press and move:
if not on point: draws line along which points will be added when mouse is no longer held, triangles will be added as well. Interior points will be included in triangulation
if on point, that point will be moved. If control is pressed as well, other selected points will be moved as well
Right-click and move: select points/match points
- Right-click:
on point: bring up dialog allowing you to set specific coordinates, time delay info and point group name
on FITS image: bring up dialog allowing you to change center and min/max value for the brightness scale
Double click point/match point: allows to edit point group name or match point name
Double click on one of a set of selected points: create triangulation
- Double click elsewhere:
If FITS layer active: center on that point
If image layer active: match image to visible FITS layer
If points layer active: start contour finder based on what’s visible around the clicked position.
Control-delete: remove selected triangles
Shift-delete: remove selected points, and affected triangles
Control-C: copy
Control-X: cut
Control-Z: undo
Control-L: detect contour levels around central position (cfr double click)
Control-E: export visible images to images data file
Shift-Control-Z: redo
Double click on layer in list widget: make that layer active
Right click on layer in list widget: popup menu with options
Just ‘c’: center on selected points
- Number 0-9:
No ‘control’ or ‘alt’: set zoom to 2^number
With ‘control, but no ‘alt’: center point layer